
源文GitHub地址:https://github.com/lucysrausch/hoverboard-firmware-hack
翻译自诉:
此存储库包含通用 Hoverboard 主板的开源固件。您可以在此处找到的固件允许您将 Hoverboard 硬件(如主板、电机和电池)用于很酷的项目,例如驾驶扶手椅、人员跟踪运输机器人以及您可以想象到的需要控制电机的所有其他应用。
如果您想大致了解如何使用此固件,请观看约 40 分钟的有关此项目的视频: https://media.ccc.de/v/gpn18-95-howto-moving-objects
以下是一些已完成项目的详细构建说明。如果可能,预构建固件版本可用于这些用例,因此您无需自己编译固件
TranspOtter:https://github.com/lucysrausch/hoverboard-firmware-hack/wiki/Build-Instruction: -TranspOtter
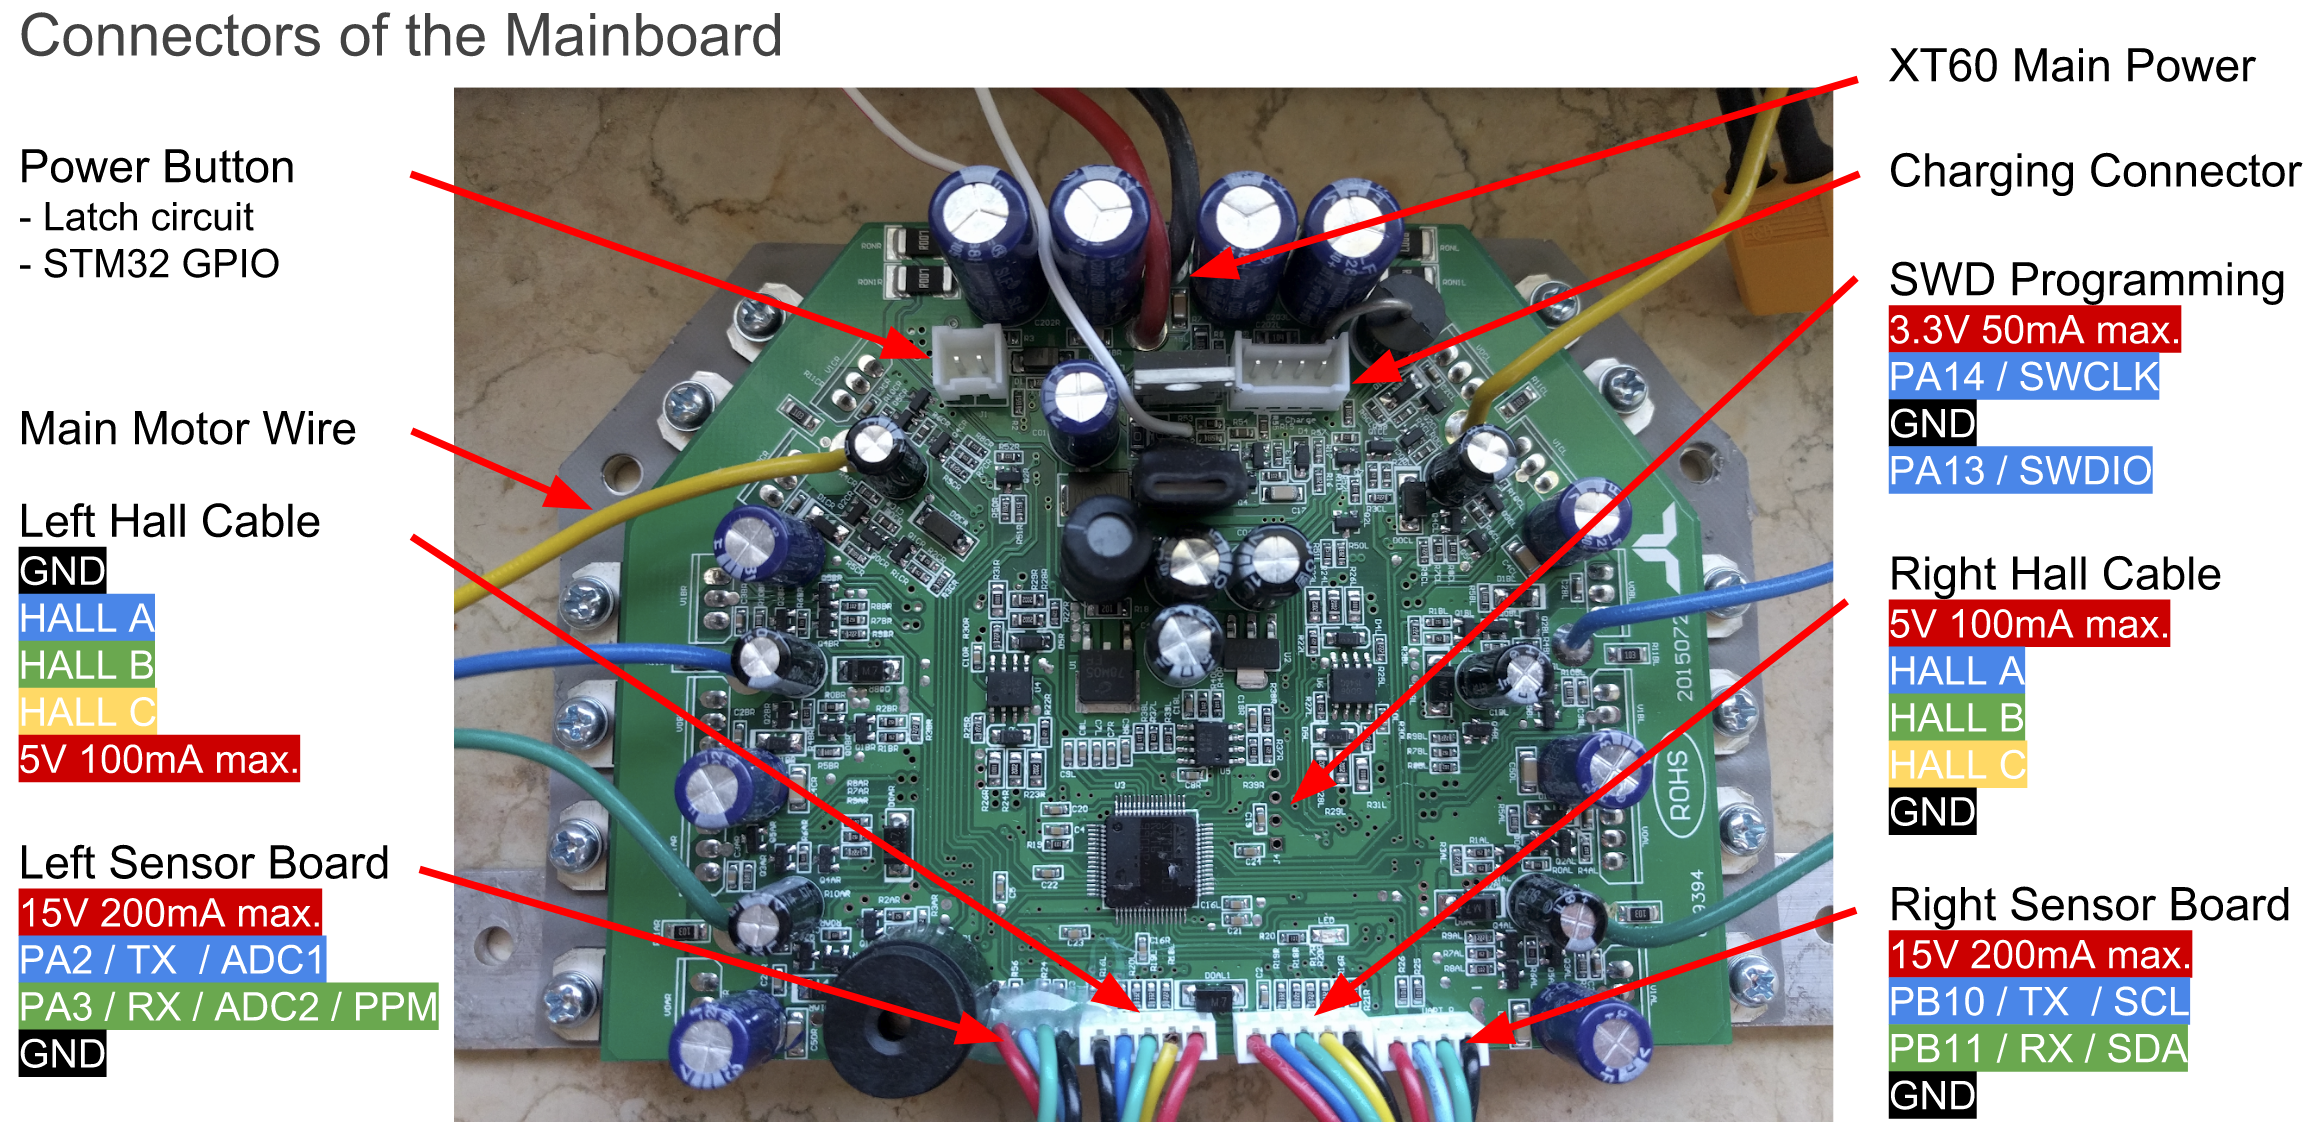
原始硬件支持最初连接到两个传感器板的两根 4 针电缆。他们将Hoverboard主板的GND、12/15V和USART2&3引出。 USART2 & 3 均可用于 UART 和 I2C,PA2&3 可用作 12 位 ADC。
主板的逆向工程原理图可以在这里找到: http://vocke.tv/lib/exe/fetch.php ?media=20150722_hoverboard_sch.pdf
要构建固件,只需输入“make”。确保您已在 Makefile 中指定了 gcc-arm-none-eabi 二进制位置(“PREFIX = ...”)(版本 7 有效,有一个版本无效!)(如果 linux 存储库中的 ons 不有效)工作,使用官方版本:https://developer.arm.com/open-source/gnu-toolchain/gnu-rm/downloads)。 STM32 的右侧有一个带有 GND、3V3、SWDIO 和 SWCLK 的调试头。将 GND、SWDIO 和 SWCLK 连接到 SWD 编程器,就像许多 STM 开发板上的 ST-Link 一样。
请勿使用编程器的 3.3V 电源为主板供电!这已经杀死了多个主板。
确保在刷新固件时按住电源按钮或将跳线连接到电源按钮引脚,因为在刷新期间 STM 可能会释放电源闩锁并自行关闭。闪烁时必须连接电池 > 36V。
要刷新 STM32,请使用 ST-Flash 实用程序 ( https://github.com/texane/stlink )。
如果您以前从未刷新过主板,则 STM 可能已锁定。要解锁闪存,请使用以下 OpenOCD 命令:
openocd -f interface/stlink-v2.cfg -f target/stm32f1x.cfg -c init -c "reset halt" -c "stm32f1x unlock 0"
如果这不起作用:
openocd -f interface/stlink-v2.cfg -f target/stm32f1x.cfg -c init -c "reset halt" -c "mww 0x40022004 0x45670123" -c "mww 0x40022004 0xCDEF89AB" -c "mww 0x40022008 0x45670123" -c "mww 0x40022008 0xCDEF89AB" -c "mww 0x40022010 0x220" -c "mww 0x40022010 0x260" -c "sleep 100" -c "mww 0x40022010 0x230" -c "mwh 0x1ffff800 0x5AA5" -c "sleep 1000" -c "mww 0x40022010 0x2220" -c "sleep 100" -c "mdw 0x40022010" -c "mdw 0x4002201c" -c "mdw 0x1ffff800" -c targets -c "halt" -c "stm32f1x unlock 0"
openocd -f interface/stlink-v2.cfg -f target/stm32f1x.cfg -c init -c "reset halt" -c "mww 0x40022004 0x45670123" -c "mww 0x40022004 0xCDEF89AB" -c "mww 0x40022008 0x45670123" -c "mww 0x40022008 0xCDEF89AB" -c targets -c "halt" -c "stm32f1x unlock 0"
或者使用 Windows ST-Link 实用程序。
然后你可以简单地刷新固件:
st-flash --reset write build/hover.bin 0x8000000
或者
openocd -f interface/stlink-v2.cfg -f target/stm32f1x.cfg -c flash "write_image erase build/hover.bin 0x8000000"
首先,检查电源是否已连接,并且闪烁时电压>36V。如果该板在空闲时消耗超过 100mA 的电流,则它可能已损坏。
如果电机执行某些操作,但旋转不平稳、安静,请尝试使用替代相位映射。通常,颜色正确的映射(蓝色到蓝色、绿色到绿色、黄色到黄色)效果很好。但是,某些悬浮滑板的布局与其他悬浮滑板不同,这可能是您的电机不旋转的原因。
双节棍不起作用:使用两种双节棍中正确的一种。使用 i2c 上拉电阻。
Nunchuck 或 PPM 工作不良:i2c 总线和 PPM 信号对电机控制器的 emv 失真非常敏感。你跑得越快,它们就越强大。保持电缆短、使用屏蔽电缆、使用铁氧体、稳定双节棍或恢复器中的电压、添加 i2c 上拉电阻。许多错误会导致非常高的加速度,从而触发电池内的保护板关闭所有功能。
最可靠的输入方法是使用 ADC 和电位器。即使在 1m 非屏蔽电缆上也能正常工作。将 ADC 输入和接地之间的约 100k 欧姆电阻直接焊接在主板上。使用 Potis 作为 3.3V 的上拉电阻。
查看 Inc 目录中的 config.h。您可以在此处配置固件以匹配您的项目。目前支持:Wii Nunchuck、模拟电位计和来自 RC 遥控器的 PPM-Sum 信号。通过 UART 进行控制的一个很好的例子,例如。来自 Arduino 或 raspberryPi,可以在这里找到: https://github.com/phail/hoverboard-firmware-hack
如果您需要诸如增强按钮之类的附加功能,请查看 main.c 中的 while(1) 循环
分线/互连板 用于气垫板黑客攻击的分线/互连板。
使用操纵杆控制轮椅或使用 CC2650 传感器标签通过蓝牙进行俯仰/滚动控制。
TranspOtterNG TranspOtter是一个基于悬浮滑板硬件的开源半自动驾驶交通平台
BiPropellant - 叉子专注于可靠的机器控制,但如果需要,也保留 HoverBoard 功能。
This repo contains open source firmware for generic Hoverboard Mainboards. The firmware you can find here allows you to use your Hoverboard Hardware (like the Mainboard, Motors and Battery) for cool projects like driving armchairs, person-tracking transportation robots and every other application you can imagine that requires controlling the Motors.
If you want an overview of what you can do with this firmware, here is a ~40min video of a talk about this project: https://media.ccc.de/v/gpn18-95-howto-moving-objects
Here are detailed build instructions for some finished projects. If possible, a prebuild firmware release is available for these usecases, so you don't need to compile the firmware yourself
TranspOtter: https://github.com/lucysrausch/hoverboard-firmware-hack/wiki/Build-Instruction:-TranspOtter
The original Hardware supports two 4-pin cables that originally were connected to the two sensor boards. They break out GND, 12/15V and USART2&3 of the Hoverboard mainboard. Both USART2 & 3 can be used for UART and I2C, PA2&3 can be used as 12bit ADCs.
The reverse-engineered schematics of the mainboard can be found here: http://vocke.tv/lib/exe/fetch.php?media=20150722_hoverboard_sch.pdf
To build the firmware, just type "make". Make sure you have specified your gcc-arm-none-eabi binary location in the Makefile ("PREFIX = ...") (version 7 works, there is a version that does not!) (if the ons in linux repos do not work, use the official version: https://developer.arm.com/open-source/gnu-toolchain/gnu-rm/downloads). Right to the STM32, there is a debugging header with GND, 3V3, SWDIO and SWCLK. Connect GND, SWDIO and SWCLK to your SWD programmer, like the ST-Link found on many STM devboards.
Do not power the mainboard from the 3.3V of your programmer! This has already killed multiple mainboards.
Make sure you hold the powerbutton or connect a jumper to the power button pins while flashing the firmware, as the STM might release the power latch and switches itself off during flashing. Battery > 36V have to be connected while flashing.
To flash the STM32, use the ST-Flash utility (https://github.com/texane/stlink).
If you never flashed your mainboard before, the STM is probably locked. To unlock the flash, use the following OpenOCD command:
openocd -f interface/stlink-v2.cfg -f target/stm32f1x.cfg -c init -c "reset halt" -c "stm32f1x unlock 0"
If that does not work:
openocd -f interface/stlink-v2.cfg -f target/stm32f1x.cfg -c init -c "reset halt" -c "mww 0x40022004 0x45670123" -c "mww 0x40022004 0xCDEF89AB" -c "mww 0x40022008 0x45670123" -c "mww 0x40022008 0xCDEF89AB" -c "mww 0x40022010 0x220" -c "mww 0x40022010 0x260" -c "sleep 100" -c "mww 0x40022010 0x230" -c "mwh 0x1ffff800 0x5AA5" -c "sleep 1000" -c "mww 0x40022010 0x2220" -c "sleep 100" -c "mdw 0x40022010" -c "mdw 0x4002201c" -c "mdw 0x1ffff800" -c targets -c "halt" -c "stm32f1x unlock 0"
openocd -f interface/stlink-v2.cfg -f target/stm32f1x.cfg -c init -c "reset halt" -c "mww 0x40022004 0x45670123" -c "mww 0x40022004 0xCDEF89AB" -c "mww 0x40022008 0x45670123" -c "mww 0x40022008 0xCDEF89AB" -c targets -c "halt" -c "stm32f1x unlock 0"
Or use the Windows ST-Link utility.
Then you can simply flash the firmware:
st-flash --reset write build/hover.bin 0x8000000
or
openocd -f interface/stlink-v2.cfg -f target/stm32f1x.cfg -c flash "write_image erase build/hover.bin 0x8000000"
First, check that power is connected and voltage is >36V while flashing. If the board draws more than 100mA in idle, it's probably broken.
If the motors do something, but don't rotate smooth and quietly, try to use an alternative phase mapping. Usually, color-correct mapping (blue to blue, green to green, yellow to yellow) works fine. However, some hoverboards have a different layout then others, and this might be the reason your motor isn't spinning.
Nunchuck not working: Use the right one of the 2 types of nunchucks. Use i2c pullups.
Nunchuck or PPM working bad: The i2c bus and PPM signal are very sensitive to emv distortions of the motor controller. They get stronger the faster you are. Keep cables short, use shielded cable, use ferrits, stabilize voltage in nunchuck or reviever, add i2c pullups. To many errors leads to very high accelerations which triggers the protection board within the battery to shut everything down.
Most robust way for input is to use the ADC and potis. It works well even on 1m unshielded cable. Solder ~100k Ohm resistors between ADC-inputs and gnd directly on the mainboard. Use potis as pullups to 3.3V.
Have a look at the config.h in the Inc directory. That's where you configure to firmware to match your project. Currently supported: Wii Nunchuck, analog potentiometer and PPM-Sum signal from a RC remote. A good example of control via UART, eg. from an Arduino or raspberryPi, can be found here: https://github.com/p-h-a-i-l/hoverboard-firmware-hack
If you need additional features like a boost button, have a look at the while(1) loop in the main.c
RoboDurdens awesome online compiler: https://pionierland.de/hoverhack/
breakout/interconnect boards Breakout/Interconnection boards for hoverboard hacking.
Bidirectional UART communication with Arduino example code
bobbycar-optimized firmware based on this one with driving modes, acceleration ramps and some other features
wheel chair controlled with a joystick or using a CC2650 sensortag to control it over bluetooth with pitch/roll.
TranspOtterNG TranspOtter is an open source semi self driving transportation platform based on hoverboard hardware
BiPropellant - fork which focusses on reliable machine control, but also retains HoverBoard functionality if desired.
发表评论